Monday, October 24, 2011

5 Ways To Improve Your LinkedIn Profile

Here is a FANTASTIC article about using LinkedIn to its fullest.


If you are a professional of any sort, you need to be on LinkedIn building your network and garnering some visibility.

  • Know your goal for your LinkedIn profile. Are you building a network, finding a job, trying to attract recruiters, establishing yourself as an expert?   Knowing your goal helps you craft every section of your LinkedIn profile.
  • Write an informative and compelling headline.  The term Manager appears on 20 million LinkedIn profiles.  Write something that helps you stand out from the crowd.
  • Get your own LinkedIn URL.  Convert that silly string of random numbers and letters on your LinkedIn profile to something that is your very own.  This enhances your personal brand.
  • Customize your website links.  Those fields into which you can place weblinks are potent.  Customize them to show all the resources you can offer.
  • Use a great photo.  Again, enhance your personal brand by using the right picture.  That awesome shot of you dancing the Macarena at a wedding may not further your LinkedIn goals.

Read about this all in more detail here:


http://jasonseiden.com/5-obvious-linkedin-mistakes/

Now excuse me for a moment while I do some LinkedIn updating!

Thursday, October 20, 2011

6 Things You Should Never Disclose on Facebook

Don't we all love Facebook? It has become a tremendous place to publish all kinds of information about ourselves.  But use caution; there are some things you should never disclose on Facebook.


1. Your birthday
Having the month and day of your birthday is not so bad, but do not include the year.  That gives identity thieves a golden piece of information usable to impersonate you.  Just today, my health insurance company used my full date of birth to confirm my identity when I called to clarify a bill.  Publish your month and day, but leave off the year.

  • Click on your Wall.
  • Near the top, click the Edit Profile button.
  • In the Birthday section, select Show only month and day in my profile.
  • As added security, click the drop-down on the right end of the Birthday section and limit your birthday information to your friends.  This way, only your Facebook friends can see your birthday.
2. Your vacation plans
I love checking-in with Facebook as much as the next person.  But checking in during a Hawaiian vacation when you live in Idaho or complaining about your red-eye flight to Europe is a way of saying, "Hey, I'm not home! Come steal from my house."  Post as many photos and enviable updates as you like when you get home.  Speaking of home...

3. Your home address
You make yourself more prone to identity theft and a potentially more vulnerable theft target.

4. Confessionals
Remember, Facebook can be an open window to your entire life and it can be difficult to take stuff back once it appears on Facebook.  Your employer--or a potential employer--may be watching.  In other words, this can be a poor place to complain about your job or how you stuffed a pancake in the office paper shredder.

5. Password clues
Is your mother's maiden name on your Facebook account?  Is that the same question you use to reset your on-line banking password?  Watch out especially for the quiz-type games where you answer 31 questions about yourself.  Don't hand out password clues or answers to potential security questions.

6. Risky Behaviors
Insurers are turning to Facebook to evaluate your risk.  Bragging about your new car which went 120mph through downtown last night may not be your best move.

Be smart.  Facebook can be terribly public, so publish with care.


Adapted from this article:
http://bit.ly/n4JO3l

Tuesday, October 18, 2011

More on the Facebook Ticker


An awesome rundown on things you can--and cannot--do with the Facebook ticker. Hat-tip to this article: Social Media Examiner
Probably the most controversial change is the addition of the News Feed Ticker. Some people hate it; others love it. But the one thing you can’t do is easily hide it. Although there are some workarounds.
news feed and news ticker
The News Feed Ticker shows all the comments, posts, likes, friendships and events of all of your friends, pages and subscriptions.
The Ticker contains posts and “activity stories” (such as friends commenting on other posts, liking pages, RSVPing to events, etc.) but now the “recent stories” area contains only posts (which can include status updates, pictures, links and videos) by friends, pages, subscriptions and stories posted by apps (such as YouTube or Networked Blogs).
The Ticker is very real-time and shows who is doing what on Facebook right now. By clicking on the down arrow in the upper-right corner of a post, you can have more control over what you see from that person or the app that posted the story.
activity stories
Click the down arrow in the upper-right corner to adjust the settings for posts.
The “activity stories” are what appear in the Ticker, so if you don’t want to see every move made by a person, you can unsubscribe to their activity stories. You’ll still get updates when that person posts something in their status bar. You can also decide if you don’t want to see updates from a certain type of application as shown in the picture above.
Something interesting about the Ticker is that previous posts by pages and friends may have a longer life than they did before. When someone comments or replies to a previous post, the story of that comment shows up in the Ticker and you can then click on the story to see the whole post again as shown in the figure below.
ticker
Posts have a longer life due to follow-up comments.
One benefit of the Ticker is if you have friends who are also connected to your fan page, and you see that they’ve replied to your fan page post in the Ticker, you can reply as your page right from the Ticker. But only if you have your Posting Preferences set to “Always Comment as your Page.” Find this setting in the Edit Page area of your Facebook page, and then select “Your Settings.”
comment
Reply as your page right from the Ticker.

Monday, October 17, 2011

Adjusting the Facebook Ticker/Chat Window On The Right

Here is a very popular question that came around during the last round of Facebook updates:
How can I turn off the Facebook ticker and chat window on the right side of my Facebook window?

Awesome question, and you have several options with that pane.  Or, as some have been known to call it, that pain.

The ticker is that spot in the upper right that keeps showing you new updates.I personally did not care for the ticker.  This reminded me far too much of the Bloomberg business channel and always grabbed my attention because it kept moving.  (Had Facebook added something shiny to that area, I would have been doomed.  Shiny and moving both and I would never have looked away.)

You can adjust the divider between the ticker and your chat friends.  Simply hover your mouse over the horizontal divider that separates your ticket and your friends.  Your mouse will become a two-headed arrow pointing up and down.  Once you see that double-arrow, click on the divider and slide it up or down.  I prefer up, so I can maximize the friends and minimize the ticker.

Or, you can hide that right side area altogether.  Do do that, just look at the far bottom of the sidebar and click the small icon which represents an arrow pointing to a door.  That will hide the entire sidebar, and potentially give you a little more space to work with.

To get the chat box back, look to the left side of your Facebook home page.  You should see a grouping of your friends that are on chat, and just above that you will see the text Friends on Chat.  Click the small icon to the right (highlighted in yellow below) to restore your ticker/chat sidebar on the right.

You'll feel like a pro when you start tuning your own Facebook page.  Pretty fun stuff.  Now go try it.


Sunday, October 16, 2011

Removing Farmville (and other) Updates from Your Facebook Feed


You love your Facebook friends.  You don't love their updates from Farmville and all the other games.  So how do you suppress the Facebook updates related to the games without suppressing all the other "real" updates coming from your friends?  Just hide the application.  And you can do it!

You have to get Facebook to show you a menu that isn't always obvious.  (Thanks, Facebook...now you're acting like the rest of my life.)  

  • To access this menu, place your mouse near the thin gray line that borders the top of the post you want to screen out, then head to the right end of that line.
  • A small down-arrow will appear in a rectangle.  Click this down-arrow.
  • A submenu will appear which has several options.
  • On the submenu--typically near the bottom--will be an option to Hide everything from that application.
  • Presto!  Facebook will then intelligently screen out updates from that application for all your friends.
You should only need to do this once per application and Facebook will screen out updates for all your friends.  In other words, you do not have to do this for each friend.  And great news...the rest of your updates from those same friends will still appear.  Now you can learn about their farm without learning about their Farmville.  Cool, eh?

Thursday, October 13, 2011

Reducing the E-Mails from LinkedIn Groups

Another question from a blog reader today...

How do I reduce the amount of e-mail LinkedIn sends me related to my group memberships?

Awesome question!  I find groups to be among the most powerful features of LinkedIn. Groups allow you to connect with large numbers of people quickly.  If you share a membership in a group, you can see the other LinkedIn member's profile even if you do not have a 1st, 2nd or 3rd level connection to them.  This is very powerful to building a network.

However, the e-mail burden can be a bit much if LinkedIn is messaging you for all the activity in the group.  Or occasionally a group becomes less relevant to you than it once was, and therefore you want to maintain membership, but limit the email notifications.  Good news: You do not need to leave a group to reduce or turn off the e-mails from a group.  Just reconfigure your e-mail settings.

This solution is fairly easy, although buried just a bit in the LinkedIn menus.  Here are the steps to tune your e-mail settings for your groups.
  • Login to your LinkedIn account.
  • Using the menu bar across the top, click on Groups, then Your Groups.

  • You will see a list of the groups to which you belong.
  • Click on the name of the group for which you want to change the e-mail settings.
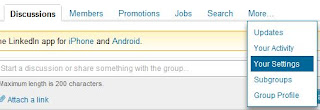
  • Below the name of the group, click on More..., then Your Settings.

  • Look for the Contact Settings section.
  • Here you can determine which e-mail address receives notifications, what e-mails you receive and how often.  Uncheck the boxes to lessen the amount of e-mail you receive for your groups.

  • You do need to change the settings for each group individually.  I do not see a clear path to changing the settings for all of your groups simultaneously.  (But if you know how, leave a comment!)
LinkedIn Groups....what an awesome feature.  Tune the amount of e-mail you receive to what works best for you to take full advantage of this great tool.

Tuesday, October 11, 2011

Using GMail to Search (but not Sort) your Mail

Back to GMail...


I received a couple questions from blog readers and am excited to answer them.  The first has to do with Sorting through your GMail. Thing is, GMail really isn't sortable, but it is highly searchable. Huh??? Read on.


GMail, being powered by the search giant Google, has what I feel to be the most powerful and simple search features of any email client.  You just pop words into the search bar located at the top of any screen and GMail returns your messages containing that word.


Simple.
Easy.
Intuitive.


But, try to sort your GMail and you'll have a whole different thing happening.  You cannot readily sort your GMail by message size or by subject or by sender.  Here is a huge departure in philosophy from Outlook, where all the column headers are clickable and instantly resort the messages in your view according to the column you click.  (In Outlook, click on the Subject column and all your messages will sort alphabetically by the Subject field.)


So you have to outsmart GMail just a bit, and start thinking like a searcher instead of a sorter.  You can use keywords to search (for example, searching on the term weather would give you all messages with the word weather, or searching on an email address gives you those messages to/from that email address.)


But that search box has more power, in two ways:


First, there is the Show Search Options link out there on the right.  Click it and you will see several additional search options pertaining to keywords, to, from, date and attachments.  This part is fairly intuitive.


Second, if you do not want to use the Show Search Options link, that search box itself can handle many arguments which will help you search your GMail and return the results you want.  For example, if you have many unread messages scattered out over your Inbox and you want to view ONLY your unread messages in your Inbox, use this in the search box:


is:unread in:inbox


Bingo.  You will see all unread messages in your Inbox.


Change the operators to change your search.  You might try:


is:starred in:anywhere


The above search returns any starred message from anywhere within your GMail account.  This is all rather fun once you catch on.  


Or consider:


delta from:matt

Now GMail returns any message with the word Delta from anyone named Matt.  So now I can easily lay my hands on my travel itinerary with Delta Air Lines which Matt sent me.


Just keep thinking about searching, instead of sorting, and you will have it.  I am closing with a great video (less than one minute) which also shows you some of these same features visually.  Just like Life cereal...Try it; You'll Like it.


Monday, October 10, 2011

Brady Bunch: The Wireless Network and Printers

Start humming your best Brady Bunch theme.  This entry is a sing-along with new lyrics...


Here's a story /
Of a wireless printer / 
Which was purchased /
With guidance from Best Buy /
It worked well on /
The home network /
And we thought all was well.

Here's a story /
Of a great employee /
Who started to print /
To their new toy.
But when using /
Her work laptop /
Nothing would print at all.

So the one day when the laptop met this printer /
And we knew that this was much more than a hunch /
The VPN would not work with the printer /
And they spent all night on call with The Help Desk Bunch.

The Help Desk Bunch /
Read along to avoid the Help Desk Bunch.

So classic TV theme songs aside....what's the point here?  If you have a wireless printer at your home, you generally will not be able to print items to it from a work laptop that is using your home wireless network to connect to a corporate network.

For security reasons, anytime you make a VPN connection (that's a virtual private network), your laptop is isolated from everything else on your home wireless network, including any wireless printers.  Therefore you cannot print to wireless printers while on that VPN.  Think of this...if your laptop was not isolated, anyone else on your home network (including an unwelcome lurker stealing your wireless signal from the driveway) could connect to your laptop and would assume your access to your corporate network.  For your security, the VPN restricts you from communication with any other wireless device while you are connected over VPN, including a printer.

If you need to print, you often can print using a cable (often the USB cable) which physically connects your laptop to your home printer.  This will somewhat depend on any restrictions which your company has placed on your laptop.  Generally speaking, however, the direct cable is not impacted by VPN and the printing should work.

Sunday, October 9, 2011

The Windows Key

The Windows Key: It is on most keyboards.  It looks like an additional big of underhanded marketing from Microsoft hawking its software, and it is.  But it also provides a potentially shortar path to a bunch of Windows tasks you probably perform every day.  Those of you who relish using the keyboard will love this one for quick keyboard shortcuts.  Here are some of the shortcuts the Windows key will help you with.

  • Win + L to lock the desktop.  This is an easy time saver.  Instead of going through Ctrl+Alt+Del and then clicking Lock Workstation, just use Win + L and your workstation will immediately lock in one keystroke.
  • Win + D to show the desktop.  Using Win + D a second time will restore all programs.
  • Win + E to open Windows Explorer.  (Note: That will open Windows Explorer, not Internet Explorer)
  • Win + F to open Windows Search. (Think of the word Find.)
  • Win + F1 to open Windows help.
  • Win + M to minimize all windows.
  • Win + R to open the Run dialog.
Play around with this one.  You might just find yourself enjoying the new tricks, and you are certain to wow your family and friends with your fantastic expertise.


Thursday, October 6, 2011

Using GMail in Multiple Windows

One of my initial significant beefs with GMail was the premise that everything happened within one web browser window on my computer.  When I flipped through messages or lists of messages, every single one of those transactions appeared in a single browser window, a serious departure from Lotus Notes (which puts everything on tabs) or Outlook (which uses separate windows).

Call me petty, but this was always a problem if I had things to cut/copy-and-paste between messages.  I could still copy-and-paste, but only if I drove my single window back and forth between GMail spots, and it reminded me of my non-ability to parallel park--back and forth and back and forth and back and forth until I finally settled into some semblance of order.


Then I figured out how to have GMail run in multiple windows, and I loved it.  I could have two windows open to copy e-mail addresses, phone numbers or text between GMail messages.

There are 2 routes to use GMail in multiple windows:

First, you can click the In New Window icon.  This icon does not announce itself very loudly, so look for it near the top right of your message.  Clicking this icon takes whatever message you are reading and opens it within its own new window.  This icon also appears when composing new messages, so if you are mid-way through composing a message and suddenly realize you want it in its own window, click the In New Window icon and instantly you will have another GMail window with your outbound message, with an underlying window available to you for GMail navigation.

Second (and you already know this if you read previous Encyclopedia of Matt entries), you can use the Shift key with the keyboard shortcuts to open a new window.
  • Shift + C to Compose a new message in a new window.
  • Shift + R to Reply in a new window.
  • Shift + A to Reply To All in a new window.
  • Shift + F to Forward in a new window.

I fear I have made this entire concept more difficult than it really is.  So just try it.  Trust me that you cannot actually break anything.  You will not accidentally erase your entire GMail contents.  And you might just like it.

Wednesday, October 5, 2011

Steve Jobs 1955-2011

I have never been a big user of Apple products, but always an admirer.  We lost a significant technological hero today.  With incredible innovation and business acumen, he made computing almost intuitive and gave us...

...the Macintosh

...the iPod

...the iPhone

...the iPad

...and his passion to deliver them all.


Monday, October 3, 2011

Keyboard Shortcuts in GMail: Part 2

The more I learn about GMail, the more I find it is a fairly ingenious email application, but there are several hidden gems in GMail that are not exactly undocumented, but are rather unknown to most.  Foremore among them are keyboard shortcuts, which allow you to use your keyboard to register actions rather than mousing to a button each time.


I covered Part 1 of keyboard shortcuts, including the help, Compose and Archive shortcuts.  Below are three more keyboard shortcuts that form the family of actions we most often take on pieces of e-mail:


R - Reply to a message.  Again, there is no hint or menu that tips you off that simply pressing the R key will start a reply.  Just try it while reading a message.  Press R and presto!  You have a reply started without your hands ever leaving the keyboard.


A - Reply to all.  This one is just like the Reply command above, except of course your response goes to everyone in the original message rather than just the sender.  Of course, this explains a mystery from Part 1 of keyboard shortcuts where the A key was not used for Archiving.  The developers at Google likely figured Reply to all was a more often used command than Archive, and this reserved the letter A for Reply to all.  (Remember A for Reply to all; E for Archive.)


F - Forward a message.  Again, fairly straightforward.  Press F and GMail automatically starts a Forward message so you can pass along your inbound message to someone else.


Now here is one more major trick that I really like, and it helps you bust out of GMail's limitation of sticking to one window: Add the Shift key to any of the above commands and your reply or forward will open in a new window, leaving your original message neatly in its own window.  Play around with this feature and you will really look and feel like a pro.  Having multiple GMail windows open lets you cut/copy and paste between messages much more easily.


In the screenshot to the right, I wanted to reply to my friend Rodney, and I used the Shift + R keyboard shortcut.  Instead of starting my reply in the same window, addition of the Shift key opened a new window with my reply, and made it easy to cut and paste information into my Reply.


It's a pretty sweet trick, will make you look like a GMail black belt, and may just make your life easier too.

Sunday, October 2, 2011

Giving Life to a Dying iPod Nano

I am an active runner, and today of all days, during a 10 mile run, my iPod Nano decided to give me a run for my money.  At the end of my run, the display looked like something off an old rabbit-ear television with a broken vertical control.  The display was clearly on, but it was running in odd stretchy patterns rendering it virtually unusable.

Ah, I said, I will just reset the iPod.  That has always worked before.  A reset effectively reboots an iPod, and can get it out of a non-responding state.

Here is how to Reset an iPod Nano:
  1. Make sure the switch to lockout any of the buttons is in a position to accept inputs.  (That is, it needs to be unlocked.)
  2. Press and hold the Menu button, located in the top position on the click-wheel.
  3. While holding down the Menu button, press and hold the center button.  (Unless you are incredibly talented, this is likely a two-hand operation.)
  4. Wait 8-10 seconds until the Apple logo appears on the screen.  Then release the buttons.
  5. The iPod should come back to life, ready to play with all your music and podcasts.
The operative word being should.  That trick has worked every time for me up until today.  However, on this day my iPod would not show the Apple logo, and instead showed me a very faint white screen--I affectionately called it the "White Screen of Death"-- and then my iPod actually beeped two times.  It beeped!  I didn't even know iPods could beep.

Every good tech knows if something doesn't work the first time, just try it again, and so I did.  Every good tech also knows that repeating usually doesn't work.  We just have a need to try, I suppose.

My iPod Nano was now effectively an overly-priced underpowered nightlight with its faint white screen.  So I embarked on a more potentially destructive route.  (But so what, right?  The only thing I had to lose was my "new" nightlight.)  I started the Restore process.

A Restore essentially blows away the iPod and everything thereon.  The iPod reverts to its original factory settings, sans all your music, podcasts, photos, playlists...essentially everything.  While this sounds scary, keep in mind that most of us have all our music/podcast content already stored in iTunes.  So restoring the iPod is actually fairly easy.  One sync and the iPod is back to normal.  And thankfully, this worked for me.

So should the Reset above not work--AND you have all your content on iTunes--working through the Restore process below may be just the trick.  To budget your time, this process took about 20 minutes for me.

Here is how to Restore an iPod Nano:

  1. Verify that you have an active Internet connection, because you may need to download new versions of the iTunes and iPod Software.
  2. Download and install the latest version of iTunes if necessary.
  3. Open iTunes. Connect your iPod to your computer using the USB or FireWire cable that came with your iPod.
  4. After a few moments, your iPod will appear in the Source panel in iTunes.  (That's essentially the far left column in iTunes.)
  5. Click on your iPod in the Source panel (again, the left column). You will see information about your iPod appear in the Summary tab of the main iTunes window.
  6. Click Restore.
  7. If you are using a Mac, you will be asked to enter an administrator’s name and password.
  8. A progress bar will appear on the computer screen, indicating that stage one of the restore process has begun. When this stage is done, iTunes will present one of two messages with instructions specific to the iPod model you are restoring.
    • Disconnect iPod and connect it to iPod Power Adapter (typically applies to older iPod models).
    • Leave iPod connected to computer to complete restore (typically applies newer iPod models, including my own.)
  9. During stage two of the restore process, the iPod displays an Apple logo as well as a progress bar at the bottom of the display. It is critical that the iPod remain connected to the computer or iPod power adapter during this stage.
    Note: The progress bar may be difficult to see, because the backlight on the iPod display may be off.
  10. After stage two of the restore process is complete, the iTunes Setup Assistant window will appear. It will ask you to name your iPod and choose your syncing preferences, as it did when you connected your iPod for the first time.
  11. After completing those quick questions, your iPod should sync with iTunes, restoring all your content.
Presto!  Nightlight out.  Fully functional iPod in.  And for some odd reason, I think my iPod is working better than ever before.

If your iPod is giving you problems, try it; it sure beats forking over $149 to replace your nightlight.


Saturday, October 1, 2011

Keyboard Shortcuts in GMail: Part 1

GMail is probably one of my favorite applications ever because it does so darn much, doesn't require anything on your home computer except a web browser, is very customizable, has some outstanding search capabilities, and is readily available anytime anywhere, such as on my mobile phone or someone else's computer.


Because I formerly used Outlook at work, I learned the keyboard shortcuts in Outlook to avoid the back-and-forth time wasting motion of moving my right hand off the keyboard to the mouse.  A journey of just three inches does not seem like much until it is done repetitively for every single message.


Thankfully, GMail has some great keyboard shortcuts built which can save you some time.  In my customary style, I will throw out a few at a time.


One CRITICAL prerequisite: The Keyboard Shortcuts must be turned On.  They are On by default, but this could be a great thing to check, and it's easy to do.  To verify:

  1. Click the small gear icon in the far upper right, then click Mail Settings. (You'll be going here a lot as you keep learning more about GMail.)
  2. On the General tab--which should appear by default--look for the Keyboard Shortcuts section a few lines down from the top.
  3. Make sure this section is tuned to Keyboard Shortcuts On.
  4. If it is already, just go back to your Inbox by clicking Inbox on the left.
  5. If not, change the radio button to Keyboard Shortcuts On, then scroll all the way to the bottom of the page and click the Save Changes button.


The keyboard shortcuts that I think are most useful:


Ctrl + ? - Show a list of all the keyboard shortcuts.  This is a great way to review the list of dozens of shortcuts and spot the ones you think will be used most often.  Occasionally the list will trail off the bottom of your screen.  If so, just click the link marked Open in a New Window to make them easier to read.


C - Compose a new message. What a huge timesaver! No need to navigate that mouse onto that Compose Mail button.  This one seems a little counter-intuitive because there is no hint that a single keystroke on the C key will do anything.  But try it; it works.


E - Archive the message.  One of the most powerful features of GMail, archiving is available with one press of the E key.  Why E instead of A?  Well, I'm not a GMail developer so I can't say for sure, other than to report that A is reserved for something else, so stay tuned.


Hope this helps you speed along the Information Superhighway.